> For the complete documentation index, see [llms.txt](https://doc.engenius.ai/llms.txt). Markdown versions of documentation pages are available by appending `.md` to page URLs; this page is available as [Markdown](https://doc.engenius.ai/cloud-configuration-guide/topics/saml-sso-with-adfs/adfs-configuration.md).

# ADFS Configuration

{% hint style="success" %}
This guide provides the steps for configuring ADFS on <mark style="background-color:yellow;">**Windows Server 2022**</mark> as an IdP. Please note that images used in the steps may vary with Windows Server updates.
{% endhint %}

## <mark style="color:blue;">Create “Relying Party Trust”</mark>

1. Launch the AD FS management console from **Start > Administrative Tools > AD FS Management**.
2. Select '**AD FS**' at the top and from the Actions menu, choose '**Add Relying Party Trust**'.

<figure><img src="/files/5jzGVR7fV9zSu4hallFs" alt=""><figcaption><p>2-1 Add Relying Party Trust</p></figcaption></figure>

3. Click '**Start**' to configure a new trust for Dashboard.
4. Opt to '**Enter data about the relying party manually**' and click '**Next**'.

<div align="left"><figure><img src="/files/qP8uPnVLEqdGLteC49tK" alt="" width="563"><figcaption><p>2-2 Enter data about the relying party manually</p></figcaption></figure></div>

5. Provide a '**Display name**' such as "*EnGenius Cloud*" for identification in the console and for users, then proceed with '**Next**'.

<div align="left"><figure><img src="/files/xtyHJyGiczUx9eSt9Xpq" alt="" width="563"><figcaption><p>2-3 Display Name</p></figcaption></figure></div>

6. Bypass the '**Configure Certificate**' step by selecting '**Next**'.
7. Check the box to **Enable support for the SAML 2.0 WebSSO** protocol. Input the EnGenius Cloud's '**Consumer URL**' into the text field and click '**Next**'.

<div align="left"><figure><img src="/files/8stz6FMps6Qv0wTBuGPM" alt="" width="563"><figcaption><p>2-4 Enable support for the SAML 2.0 WebSSO</p></figcaption></figure></div>

{% hint style="info" %}
The Consumer URL can be found under **Organization > MSP Portal > Teams> Team Management > SAML SSO Settings ( from the IdP configuration)**.
{% endhint %}

8. For '**Relying party trust identifier**', input "<mark style="background-color:green;"><https://msp-sso.engenius.ai></mark>", click '**Add**', then '**Next**'.&#x20;

<figure><img src="/files/irpu27JLcRBbmvq4opGr" alt=""><figcaption><p>2-5 Relying  party trust identifier</p></figcaption></figure>

<div align="left"><figure><img src="/files/lVuc1DzdEJTm5y4XLiBJ" alt="" width="253"><figcaption><p>2-6 Relying  party trust identifier</p></figcaption></figure></div>

{% hint style="info" %}
**Relying Party Trust ID in SAML Authentication**

The Relying Party Trust Identifier is a unique identifier that an Identity Provider uses to recognize and authenticate the specific Service Provider (**The EnGenius Cloud**) in a SAML setup.
{% endhint %}

9. Set default authorization rules; for this guide, choose '**Permit everyone**' and click '**Next**'.&#x20;

<div align="left"><figure><img src="/files/w999GqXhr0x6d4ELJh1M" alt="" width="563"><figcaption><p>2-7 Permit everyone</p></figcaption></figure></div>

## <mark style="color:blue;">Configure Username Attributes (email)</mark>

1. Open the '**Edit Claim Rules**' dialog and go to the '**Issuance Transform Rules**' tab, then click '**Add Rule**'.

<div align="left"><figure><img src="/files/ez9C4ZdTyK60XEGJiRAU" alt="" width="375"><figcaption><p>2-8 Edit Claim Rules</p></figcaption></figure></div>

2. Choose '**Send LDAP Attributes as Claims**' as the template and click '**Next**'.

<div align="left"><figure><img src="/files/0vcdP4j47k02022u73ft" alt="" width="563"><figcaption><p>2-9 Send LDAP Attributes as Claims</p></figcaption></figure></div>

3. To configure a username attribute for SAML:

* Name the **claim rule** "Email".
* Choose '**Active Directory**' for the attribute store.
* Select a unique **LDAP Attribute**, like **E-Mail-Addresses** that will be sent to the EnGenius Cloud as the username.
* Set the **Outgoing Claim Type** to "<mark style="background-color:green;">email</mark>"
* Click '**Finish**'.

<div align="left"><figure><img src="/files/RKVWyp9fGTMZcqedlNvw" alt="" width="563"><figcaption><p>2-10 Outgoing Claim Type</p></figcaption></figure></div>

{% hint style="info" %}
**Outgoing Claim Type**

An "Outgoing Claim Type" is a user attribute, like an email or username, that ADFS sends to a Service Provider (EnGenius Cloud) to identify and authorize users in SAML transactions.
{% endhint %}

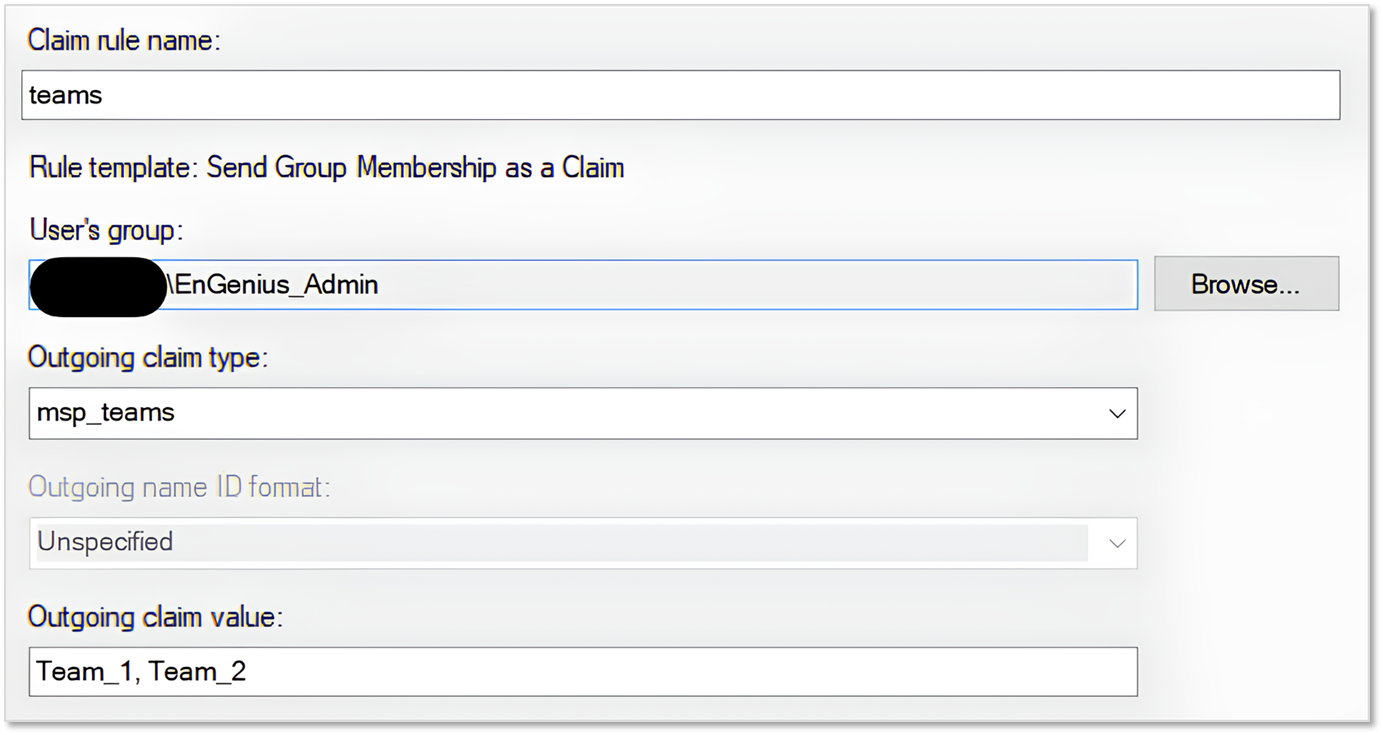
## <mark style="color:blue;">Configure Role Attributes (Team Privilege)</mark>

1. Open '**Edit Claim Rules**', navigate to '**Issuance Transform Rules**', and select '**Add Rule**'.
2. For the template, select '**Send Group Membership as a Claim**'.
3. Name the **claim rule** "Teams" for assigning user roles.
4. Use '**Browse**' to pick a group for the role assignment.
5. Set the **Outgoing claim type** to "<mark style="background-color:green;">msp\_teams</mark>".
6. Enter the matching Role/Team value from The MSP Portal’s Teams role in '**Outgoing claim value**' to grant access.

<div align="left"><figure><img src="/files/ghDhk3WHKrR6pUGcHVsM" alt="" width="563"><figcaption><p>2-11 Configure Role Attributes</p></figcaption></figure></div>

7. Click '**Finish**'.

{% hint style="info" %}
The role/team must correspond with one in EnGenius Cloud under **Organization > MSP Portal> Teams> Team Privileges**.
{% endhint %}

<div align="left"><figure><img src="/files/wsHjz27ksOQYqijsA8fT" alt=""><figcaption><p>2-12 Configure 'Team Privilege' on EnGenius Cloud</p></figcaption></figure></div>

\ <mark style="color:blue;">**Accessing EnGenius Cloud with ADFS Authentication**</mark>
----------------------------------------------------------------------------------------

Users authenticated via ADFS can now sign into the "**EnGenius Cloud**".

<div align="left"><figure><img src="/files/IFKH2BbLLa0J8sQ4qLMz" alt="" width="375"><figcaption><p>2-13 ADFS Sign-In Page</p></figcaption></figure></div>

{% hint style="info" %}

### Setting Up EnGenius Cloud Account via ADFS Portal

If this is your first time accessing EnGenius Cloud service through your company's ADFS portal, you'll need to set up a user account initially. Once done, this will allow for automatic sign-in thereafter. The user account includes the following data:

* User name
* Email
* Region
  {% endhint %}

<figure><img src="/files/mRojksZ5MuRIwISFYRxr" alt=""><figcaption><p>2-14 Access EnGenius Cloud for the first time</p></figcaption></figure>


---

# Agent Instructions
This documentation is published with GitBook. GitBook is the documentation platform designed so that both humans and AI agents can read, navigate, and reason over technical content effectively. Learn more at gitbook.com.

## Querying This Documentation
If you need additional information that is not directly available in this page, you can query the documentation dynamically by asking a question.

Perform an HTTP GET request on the current page URL with the `ask` query parameter, and the optional `goal` query parameter:

```
GET https://doc.engenius.ai/cloud-configuration-guide/topics/saml-sso-with-adfs/adfs-configuration.md?ask=<question>&goal=<endgoal>
```

`ask` is the immediate question: it should be specific, self-contained, and written in natural language.
`goal` is optional and describes the broader end goal you are ultimately trying to accomplish on behalf of the user. GitBook uses it to tailor the answer towards what is most useful for that goal.

The response will contain a direct answer to the question and relevant excerpts and sources from the documentation.

Use this mechanism when the answer is not explicitly present in the current page, you need clarification or additional context, or you want to retrieve related documentation sections.