> For the complete documentation index, see [llms.txt](https://doc.engenius.ai/llms.txt). Markdown versions of documentation pages are available by appending `.md` to page URLs; this page is available as [Markdown](https://doc.engenius.ai/s11-user-guide/core-component-installation/installing-memory-dimms.md).

# Installing Memory (DIMMs)

This chapter explains how to correctly install and populate memory modules (DIMMs). Following these guidelines is essential for system stability and to get the best performance from your server.

## Memory support and population rules

To ensure your server runs optimally, you must use supported memory types and install DIMMs in a specific order.

<figure><img src="https://content.gitbook.com/content/jpZbCL0qpDQTXK2bjgCk/blobs/WTqhpL29s5gcsg4PHDrR/3.5.png" alt=""><figcaption></figcaption></figure>

### **Supported Memory Types**

| **Processor**             | **Memory Type** | **Max Speed (1DPC / 2DPC)** | **Max Capacity per DIMM** | **Supported Configurations** |
| ------------------------- | --------------- | --------------------------- | ------------------------- | ---------------------------- |
| Intel Xeon Scalable Gen 6 | DDR5 RDIMM      | 6400 MT/s / 5200 MT/s       | 256 GB                    | 8-channel, 1DPC or 2DPC      |

### **Memory Population Guidelines**

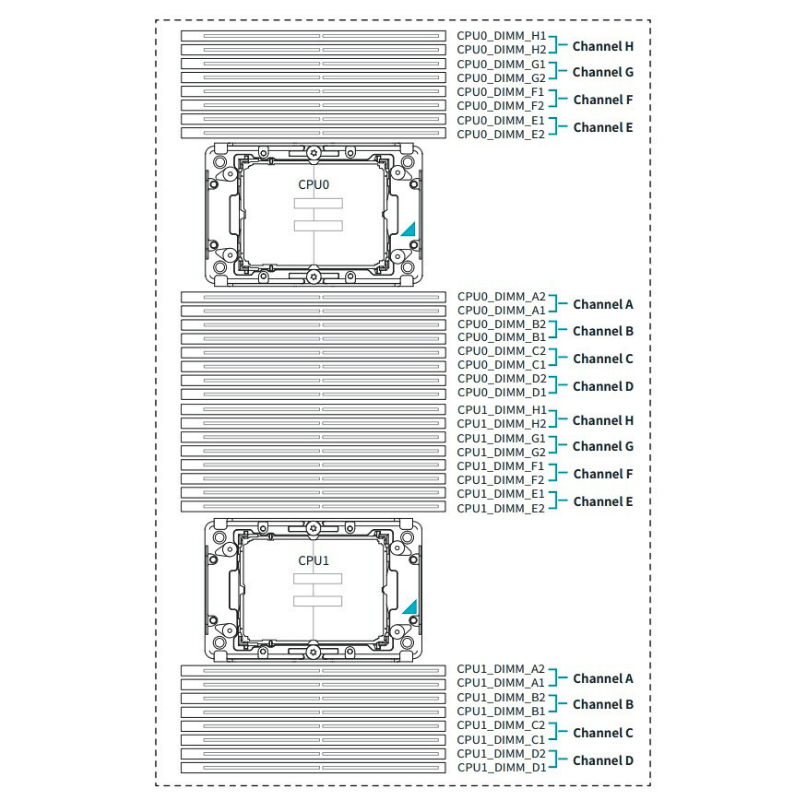
<table data-header-hidden><thead><tr><th width="135.796875"></th><th></th><th></th><th></th><th></th><th></th></tr></thead><tbody><tr><td><strong>Configuration</strong></td><td><strong>Installed CPUs</strong></td><td><strong>Total DIMM Slots</strong></td><td><strong>Max DIMMs Supporte</strong>d</td><td><strong>Population Rule</strong></td><td><strong>Performance Note</strong></td></tr><tr><td>Minimal (1DPC)</td><td>1 (CPU0 only)</td><td>8 (CPU0 side)</td><td>8</td><td>Populate slots A1, B1, C1, D1...</td><td>Enables max memory speed (e.g., 6400)</td></tr><tr><td>Balanced (2DPC)</td><td>1</td><td>8</td><td><p>16 </p><p>(with dual-rank DIMMs)</p></td><td>Fill all 8 slots evenly</td><td>Slight speed reduction expected</td></tr><tr><td>Dual CPU, 1DPC</td><td>2</td><td>16</td><td>16</td><td>Use A1–H1 (CPU0), A1–H1 (CPU1)</td><td>Maintains interleaving &#x26; bandwidth</td></tr><tr><td>Dual CPU, 2DPC</td><td>2</td><td>16</td><td><p>32 </p><p>(if supported)</p></td><td>Fill A1–H2 (CPU0), A1–H2 (CPU1)</td><td>Speed may drop (e.g., from 6400→5200)</td></tr></tbody></table>

{% hint style="danger" %}
**Common Mistake:  Mixing memory Modules**&#x20;

Never mix different types of memory (e.g., RDIMMs and LRDIMMs) or DIMMs with different speeds or capacities in the same system. This can cause boot failures, unpredictable errors, or force all memory to run at the speed of the slowest module.
{% endhint %}

## Installing a DIMM

Before you begin, make sure you are properly grounded using an ESD wrist strap.

### **To install a DIMM:**

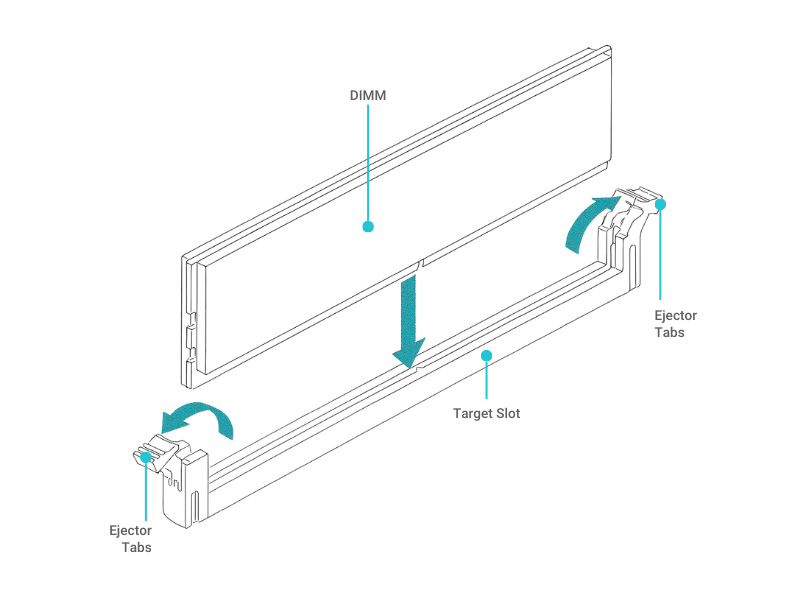
1. **Locate the correct DIMM slot.** Identify the slot you will populate based on the population rules.
2. **Open the ejector clips.** Gently press outward on the white or blue ejector clips on both ends of the slot to open them.
3. **Align the DIMM with the slot.** Hold the memory module by its edges. Align the notch on the bottom edge of the DIMM with the key in the DIMM slot.
4. **Insert the DIMM.** Press down firmly and evenly on both ends of the DIMM until it is fully seated in the slot. The ejector clips will automatically swing inward and lock the DIMM in place.

<figure><img src="https://content.gitbook.com/content/jpZbCL0qpDQTXK2bjgCk/blobs/4KoyclkRopwiylGNNkGX/3.5-C.png" alt=""><figcaption></figcaption></figure>

### Removing a DIMM

**To remove a DIMM:**

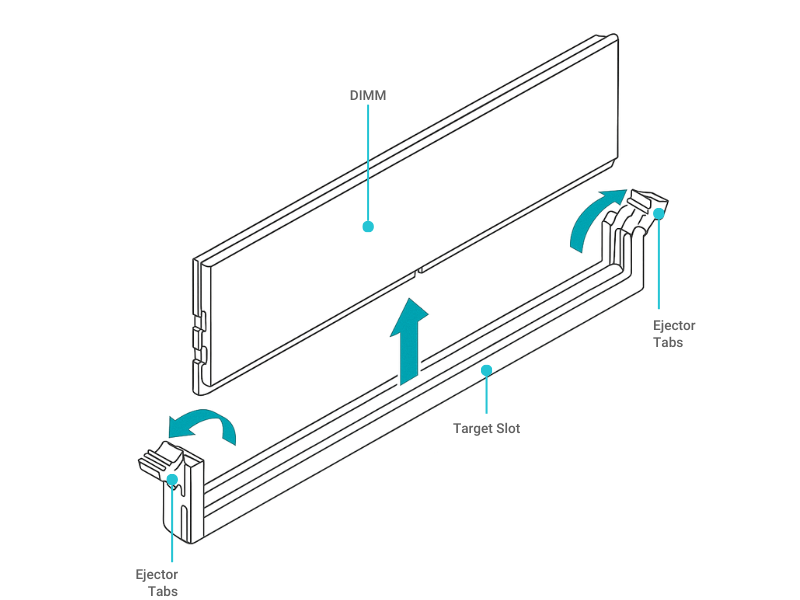
1. **Simultaneously press both ejector clips outward** to release the DIMM from the slot.
2. Gently lift the DIMM straight up and out of the slot.
3. Immediately place the removed DIMM into an anti-static bag.

<figure><img src="https://content.gitbook.com/content/jpZbCL0qpDQTXK2bjgCk/blobs/vjXmDI8kMasH4BLr3hJn/3.5-D.png" alt=""><figcaption></figcaption></figure>


---

# Agent Instructions
This documentation is published with GitBook. GitBook is the documentation platform designed so that both humans and AI agents can read, navigate, and reason over technical content effectively. Learn more at gitbook.com.

## Querying This Documentation
If you need additional information that is not directly available in this page, you can query the documentation dynamically by asking a question.

Perform an HTTP GET request on the current page URL with the `ask` query parameter, and the optional `goal` query parameter:

```
GET https://doc.engenius.ai/s11-user-guide/core-component-installation/installing-memory-dimms.md?ask=<question>&goal=<endgoal>
```

`ask` is the immediate question: it should be specific, self-contained, and written in natural language.
`goal` is optional and describes the broader end goal you are ultimately trying to accomplish on behalf of the user. GitBook uses it to tailor the answer towards what is most useful for that goal.

The response will contain a direct answer to the question and relevant excerpts and sources from the documentation.

Use this mechanism when the answer is not explicitly present in the current page, you need clarification or additional context, or you want to retrieve related documentation sections.