> For the complete documentation index, see [llms.txt](https://doc.engenius.ai/llms.txt). Markdown versions of documentation pages are available by appending `.md` to page URLs; this page is available as [Markdown](https://doc.engenius.ai/s11-user-guide/core-component-installation/installing-storage-drives.md).

# Installing Storage Drives

This chapter guides you through installing or replacing hot-swappable 2.5-inch storage drives. This server supports U.2 NVMe drives, which are installed using drive carriers.

## Drive bay overview

The chassis includes multiple front-accessible drive bays connected to the backplane.

<figure><img src="https://3449293825-files.gitbook.io/~/files/v0/b/gitbook-x-prod.appspot.com/o/spaces%2FjpZbCL0qpDQTXK2bjgCk%2Fuploads%2FMK5N08BBr92s6bCjjrEo%2FEAS1210(SR610)_F-0_20250731.png?alt=media&amp;token=1b239c28-8d54-432b-b3b6-85ee4a2e1b9d" alt=""><figcaption></figcaption></figure>

<figure><img src="https://3449293825-files.gitbook.io/~/files/v0/b/gitbook-x-prod.appspot.com/o/spaces%2FjpZbCL0qpDQTXK2bjgCk%2Fuploads%2FN8uzZkdnOFJ3gPkoFQ4s%2F1.6%20Motherboard%20%E6%A8%99%E7%A4%BA.png?alt=media&amp;token=ed53543b-fd05-4ce1-a2a0-bb4118bd8499" alt=""><figcaption></figcaption></figure>

<table data-header-hidden><thead><tr><th width="140.23828125"></th><th width="197.07421875"></th><th width="161.24609375"></th><th width="237.91796875"></th></tr></thead><tbody><tr><td><strong>Bay Number(s)</strong></td><td><strong>Interface Type</strong></td><td><strong>Controller</strong></td><td><strong>Notes</strong></td></tr><tr><td>1-12</td><td>NVMe (PCIe Gen5 x4)</td><td>Direct CPU lanes (MCIO)</td><td>High-speed, ideal for OS or cache drives.</td></tr></tbody></table>

<table data-header-hidden><thead><tr><th width="115.44921875"></th><th width="115.0234375"></th><th width="152.80859375"></th><th></th><th width="106.87890625"></th><th></th></tr></thead><tbody><tr><td><strong>Drive Type</strong></td><td><strong>Connector Type</strong></td><td><strong>Supported Backplane Type</strong></td><td><strong>Interface Lane Type</strong></td><td><strong>Hot-Swap Support</strong></td><td><strong>Notes</strong></td></tr><tr><td>U.2 NVMe SSD</td><td>SFF-8639</td><td>Standard U.2 backplane</td><td>PCIe Gen5 x4</td><td>Yes</td><td>Compatible with 2.5" NVMe slots.</td></tr></tbody></table>

## Preparing a drive carrier

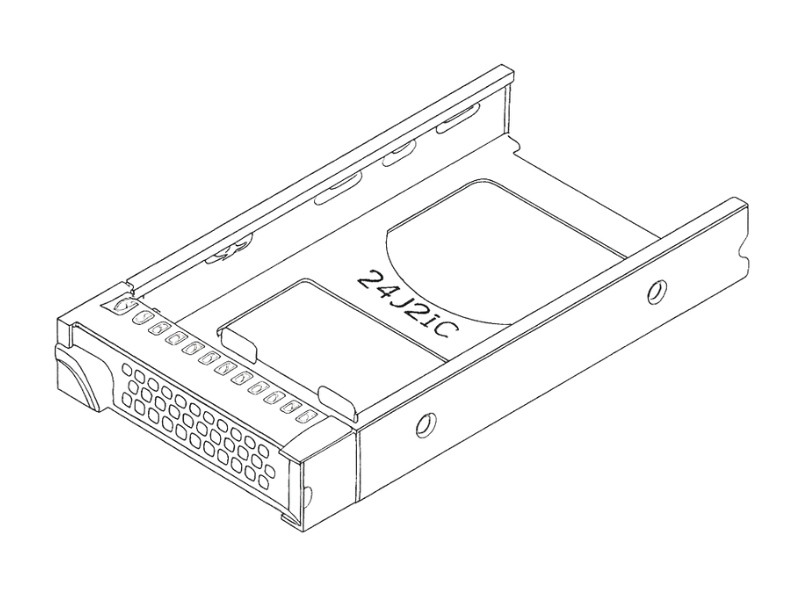
Before you can install a drive into the server, you must first mount it into a drive carrier.

### **To prepare a drive carrier:**

1. **Open the carrier's release latch.** Press the button on the front of the empty drive carrier and swing the latch open.

   <br>

   <figure><img src="https://content.gitbook.com/content/jpZbCL0qpDQTXK2bjgCk/blobs/RzoOxLteE3RjN6NXoqyu/3.7-B-Tray%20V02.png" alt=""><figcaption></figcaption></figure>
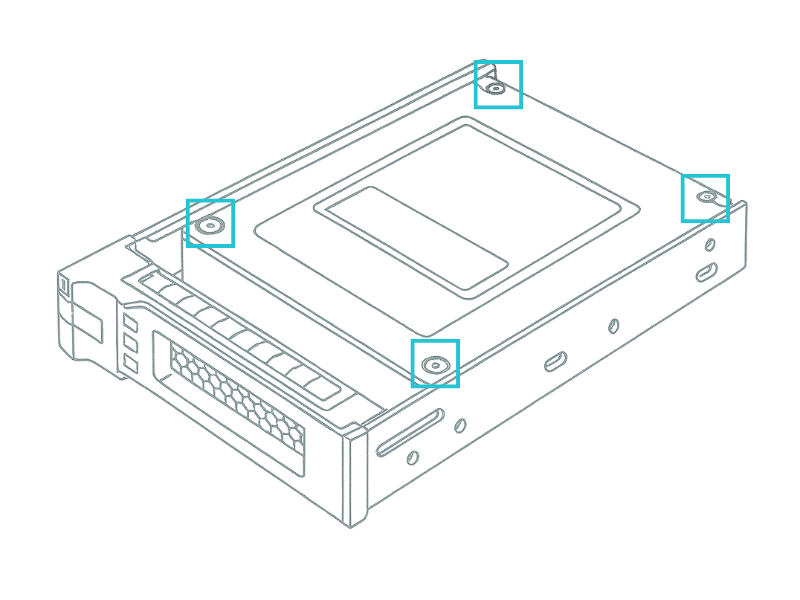
2. **Insert the drive.** Place the 2.5-inch drive into the carrier, ensuring it sits flat and the screw holes on the drive align with the holes in the carrier.
3. **Secure the drive.** Using a Phillips-head screwdriver, fasten the drive to the carrier with the four screws provided.

<figure><img src="https://content.gitbook.com/content/jpZbCL0qpDQTXK2bjgCk/blobs/oxqDrHiuhCdzu8hww1G3/3.7-B-Drive%20Carrier-%E7%B7%9A%E7%A8%BF.png" alt=""><figcaption></figcaption></figure>

{% hint style="danger" %}
**Common Mistake:  Using the Wrong Screws**&#x20;

Only use the screws that came with the server for mounting drives. Using screws that are too long can damage the drive's internal circuitry.
{% endhint %}

## Installing a drive into a bay

With the drive secured in its carrier, you're ready to install it into the server's front drive bay.

### **To install the drive:**

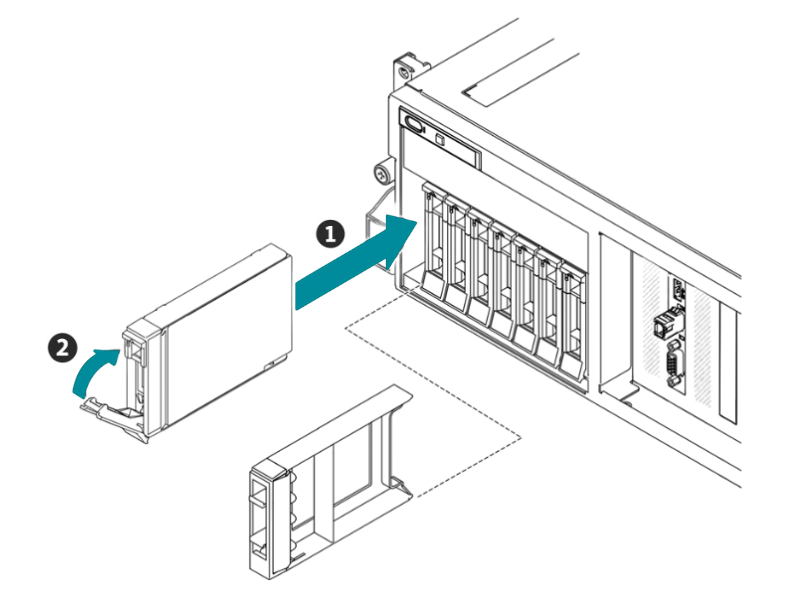
1. **Identify an empty drive bay.** Find an available bay at the front of the server.
2. **Insert the drive carrier.** With the carrier latch open, align the carrier with the guide rails in the empty bay and slide it in gently until the carrier makes contact with the backplane.
3. **Lock the drive in place.** Close the carrier latch until it clicks shut. This secures the drive and ensures a solid connection to the backplane.

<figure><img src="https://content.gitbook.com/content/jpZbCL0qpDQTXK2bjgCk/blobs/9AIlN436pwRDXpHWABE1/3.7-C.png" alt=""><figcaption></figcaption></figure>

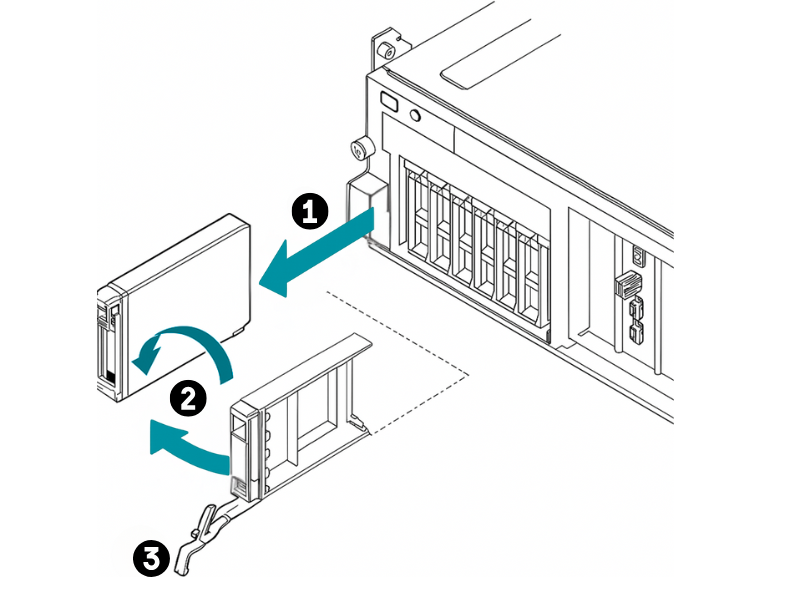
<figure><img src="https://content.gitbook.com/content/jpZbCL0qpDQTXK2bjgCk/blobs/1EXXyUaHzC0R317FnTrM/3.7-D.png" alt=""><figcaption></figcaption></figure>

### Hot-swap and NVMe considerations

One of the key features of this server is its support for hot-swapping.

{% hint style="success" %}
**Best Practice: Follow safe Removal Procedures**&#x20;

Before you physically pull a drive from a running server, you must first "prepare" it for removal using your operating system or RAID management software. This prevents data corruption.
{% endhint %}

Always consult your OS documentation for the proper NVMe hot-swap procedure.


---

# Agent Instructions
This documentation is published with GitBook. GitBook is the documentation platform designed so that both humans and AI agents can read, navigate, and reason over technical content effectively. Learn more at gitbook.com.

## Querying This Documentation
If you need additional information that is not directly available in this page, you can query the documentation dynamically by asking a question.

Perform an HTTP GET request on the current page URL with the `ask` query parameter, and the optional `goal` query parameter:

```
GET https://doc.engenius.ai/s11-user-guide/core-component-installation/installing-storage-drives.md?ask=<question>&goal=<endgoal>
```

`ask` is the immediate question: it should be specific, self-contained, and written in natural language.
`goal` is optional and describes the broader end goal you are ultimately trying to accomplish on behalf of the user. GitBook uses it to tailor the answer towards what is most useful for that goal.

The response will contain a direct answer to the question and relevant excerpts and sources from the documentation.

Use this mechanism when the answer is not explicitly present in the current page, you need clarification or additional context, or you want to retrieve related documentation sections.